
Several years ago, when we first bought our house, we did a Google search for “Houston archery range.” The local archery range list was long but included nothing close to our home–yet another downside to living in a big city. The nearest was a Gander Mountain archery range about 12 miles away. It was a nice indoor range, with knowledgeable people working there. It was rarely busy, but there were often customers there with little to no experience in archery, which (with the strict archery range rules) resulted in an exhaustively slow shooting environment. After a year or so of shooting at Gander Mountain, they decided that the indoor archery range wasn’t making enough money and the range mysteriously turned into a used firearm section.
At that point we decided that a backyard archery range was the next step for our family. We have a pretty good size cul-de-sac yard, with plenty of room, and since we weren’t setting up a strict Olympic archery range, we could design it as we wanted. We decided that a nice big backstop was important. We wanted to have it big enough so there were two shooting lanes and so it would stop any stray arrows. Additionally, we wanted permanent distance markers on the ground so that we could know from what distances we were shooting.
Building Our Home Archery Range
First thing we did was mark off the backyard with some stakes and string. We marked off both the backstop, and the shooting lane, adjusting the backstop stakes until they were at ninety degrees perpendicular to the shooting lane so that arrows wouldn’t be hitting the backstop at anything other than a 90-degree angle. Our lot boundaries meant that our maximum archery range distance was going to be 25 yards.
Next we bought supplies:
- two pressure treated 4x4s at ten foot length,
- two sheets of 1/2″ plywood,
- 3″ deck screws,
- one bag of concrete, and
- one gallon of returned exterior paint from the “oops” section at my local hardware store’s paint department.
- four hinged metal loops
- four quick release clips
There’s really nothing fancy about the construction of our homemade archery backstop. We laid the 4x4s on the ground and screwed one sheet of plywood to them with 3″ deck screws, leaving two feet at the top of each post. Then we dragged the backstop to the desired backstop location, marked where the post holes needed to be, then used a sharpshooter shovel to dig the holes. Once the holes were dug, we raised the backstop, dropped the legs into the holes, leveled it, and used spare 2x4s to brace it in place.
Once the backstop was level and braced, we poured half a bag of dry cement into each hole and then added water, using a long stick to thoroughly stir on all sides of the 4×4 posts, making certain the cement was mixed. Then we let the cement set overnight.
After the cement was completely set we added the second sheet of plywood to the top, then added a few spare 2x4s on the back for reinforcement (see pic). Then it was time to paint. We weren’t really painting for appearance sake, but mostly to seal the wood so that the backstop would last longer. The wood was thirsty, and we used the entire gallon of paint to seal the backstop, front and back.


Archery Targets

We put a lot of thought into the actual targets that we wanted to use. We wanted a system that would be easy to put up and take down, but tough enough to endure consistently placed bulls-eye shots–because some of us are just that good. 🙂 The typical styrofoam targets don’t last long for us because they quickly get hollowed out near the center of the target. And since the Houston weather (especially the heat and humidity) can be brutal, we didn’t want to leave our actual targets in place 24/7. So we needed targets that were durable and lightweight enough for our kids to put up and take down whenever someone wants to shoot.
We did our research and decided to buy a couple of Third Hand Bag (better known as “Rag Bag”) targets. Rag bags are nearly indestructible sacks made of the same (or similar) material as an Army sand bag. They’re very durable, large sacks with Velcro closures across the top. Rag bags are inexpensive to ship, because they come with no filling. You are responsible for stuffing it yourself. The manufacturer suggest rags or old clothes, but we filled ours with outdoor furniture cushions that we picked up at our local thrift store. We prefer the cushions because they are made to endure all-season outdoor conditions and are less dense (therefore lighter weight for putting up and taking down) than bunched up rags or old clothes.
Since we don’t leave the targets up all the time, finding a way of easily (but securely) attaching and detaching them was important. We attached a short length of rope and a quick release clip to each bag so that we can lift the targets up to the backstop and connect the quick-release clips to metal loops (see pics) onto the backstop. The metal loops hold the targets securely in place, and they make placing and removing the targets easy enough for our kids to do by themselves. Fast, easy, and secure. Attach, shoot, detach, then store. This keeps the targets from weathering and deteriorating prematurely.
Sound Dampening
Once we had the backstop built, and rag bags stuffed, we were really excited to start shooting. The first two shots hit the targets and all was well. But the third one missed the bag by a few inches with a loud “thud” as it hit the backstop. This was discouraging, and we wondered how much attention the sound might draw from the neighbors. Upon inspection of the arrow, we found that not only was it a loud hit, but the 40# recurve bow that we shot with had put that field-tipped arrow through the 1/2″ plywood. We decided that we need to add something to the front of the backstop to dampen the noise and also make it so the missed arrows don’t penetrate as far.
We went back to the hardware store to figure out what we could do. We needed a solution that was both waterproof, and durable, and after a bit of walking the aisles we left with interlocking rubber floor tiles and some outdoor carpet. Once home, we screwed on the tiles first, and then added the carpet, turf side facing the backstop. Now the arrows made much less noise when hitting the backstop directly, doing less damage to the arrow tips, and making stray arrows much easier to pull out.


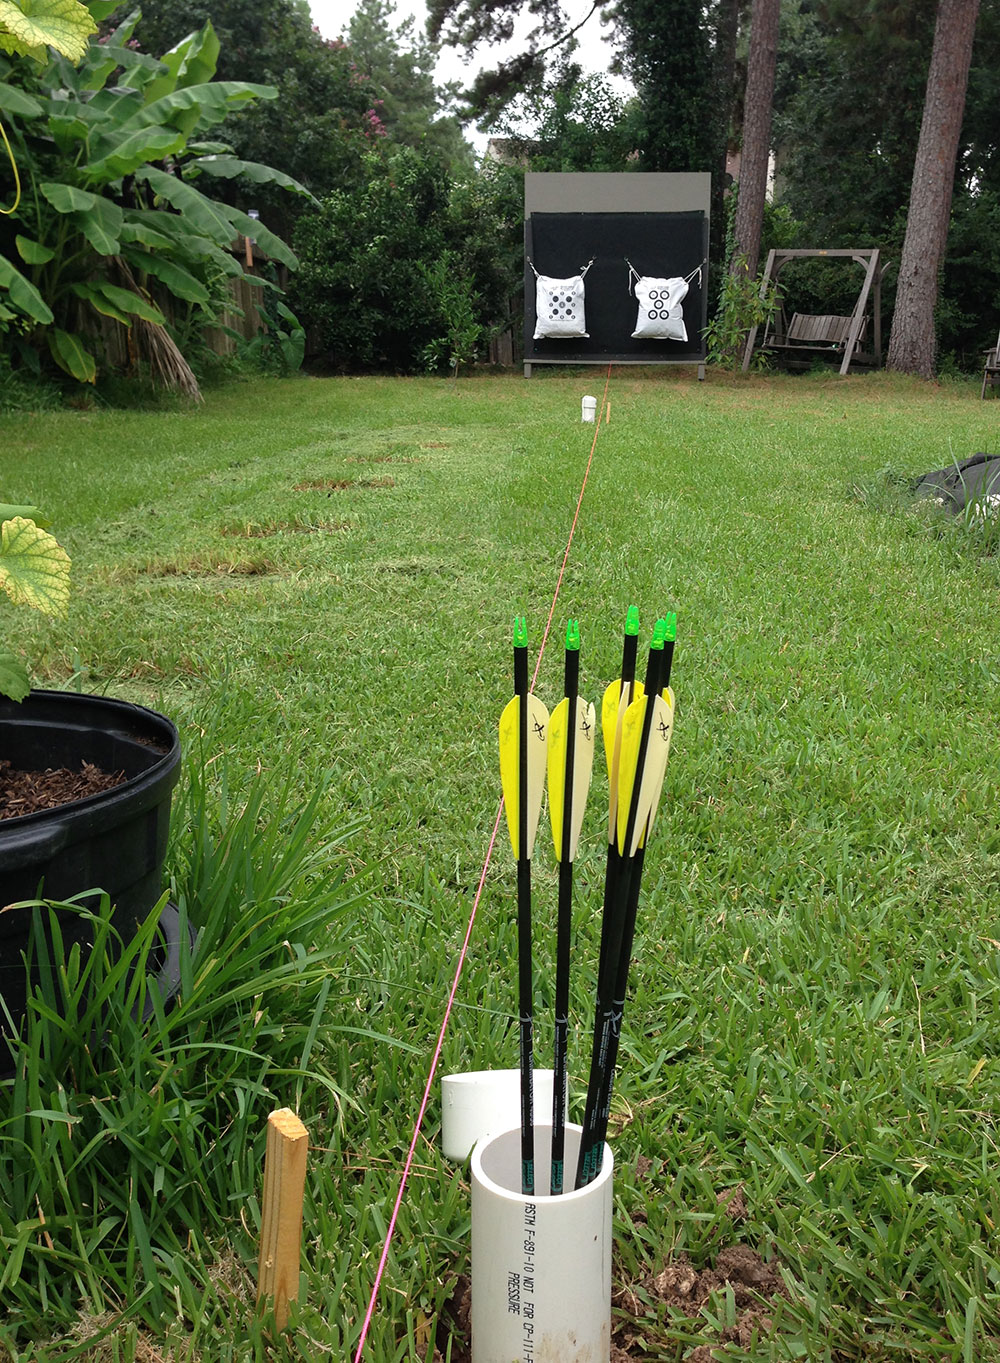
Distance Markers
Now it was time to shoot! It didn’t take us long to realize that, for skill honing (and bragging rights) we needed a way to have a general idea of how far we were shooting. With simplicity in mind, we wanted to put in permanent markers so we wouldn’t have to constantly be measuring for placement. We decided to sink 4″ PVC pipe (cut into 18″ pieces) into the lawn at 10, 20, and 25 yards from the backstop to serve both as distance markers and convenient arrow quivers. We buried them halfway into the ground so they were secure, but also high enough that we could weed eat the grass around them. This solution worked pretty nice. Until it rained and each holder completely filled up with water. We thought about drilling holes in the bottom of the PVC to drain, but decided that making a cap with a string attached to them would be easier. It’s not much of a hassle to uncap the pipes as needed, and pop the cap back on after use.
A Few Modifications
Not long after we began using it, we added a small shelf along the base so that our kids could put cans on it to shoot at with their pellet rifles. We also attached a couple of strings from the top of the backstop to use to suspend soda cans for a more interesting dynamic archery target. And we put a large hook on each side of the backstop to have a place to hang our bows while we pull arrows.

Conclusion
That is it! Our very own personal free archery range has been used for several years now and it has performed flawlessly. We haven’t had any neighbors complain about it, and we have only lost one arrow; it didn’t go over the backstop, but rather it went under and completely buried itself into the ground.
The pics posted here were taken at time of construction AND just yesterday, two-and-a-half years later. Can you tell the difference? It’s held up nicely, stopping arrows from our entire archery arsenal, including a 25# PSE Heritage Razorback, 40# Bear Kodiak Hunter, and 45# Hoyt Tiburon recurve, a 50# long bow, and a 65# Diamond Infinite Edge compound bow.


Great description and will definitely be taking this tips into consideration while creating our own backstop. My husband and I both love to shoot our bows however our makeshift backstop (a very large tree) leaves much to be desired.
Thank you Leah! We love having it close and use it often.
[…] shots at full power per fill up? When I step into the backyard to practice my bow, I usually shoot forty shots before I stop. So with the Crosman Airbow I would have to refill five […]
Maybe you should use links to Amazon in these articles for some of the things like the target or the bows your family used, I think it would generate some extra cash for the site
Three of the four were available on Amazon. Thank you for the suggestion.
I am the RO at our local gun club and want to set up an archery range for the 4H. I can put aside an acre for this effort. My question is the back stop and side berms of the shooting area. Will straw bales 750 lb big bales stop an arrow, or what do you suggest.
I’m not a big straw bale fan. They will slow down an arrow. But not always stop one. The large 750 lb bales certainly will stop an arrow. But you may have to dig for your arrow after the fact, depending on how strong your bows are. Plus they are not permanent targets. They will deteriorate over time and attract mice.
If they are inexpensive for you (or free) then it might be a good choice to use them. But I would suggest putting a layer of AstroTurf on the front of the bale to attach your targets to. It will stop the arrows and it is rain safe.
[…] our children, we actually incorporated a pellet rifle shelf on the bottom of our backyard archery target, and hooks up at the top for hanging aluminum cans on different lengths of twine. With those two […]
[…] Building Your Suburban Outdoor Archery Range […]
[…] Building Your Suburban Outdoor Archery Range […]
[…] will stop the arrows after they’re shot. You can use one of the free plans mentioned to create a DIY archery target for the range and the entire DIY project will be inexpensive and quick to […]